






Features • Guides • Installation • Usage • Miscellaneous • Contributing
🌎 README is available in other languages: 🇪🇸 . 🇨🇳 . 🇧🇷 . 🇰🇷 . 🇫🇷 . 🇩🇪
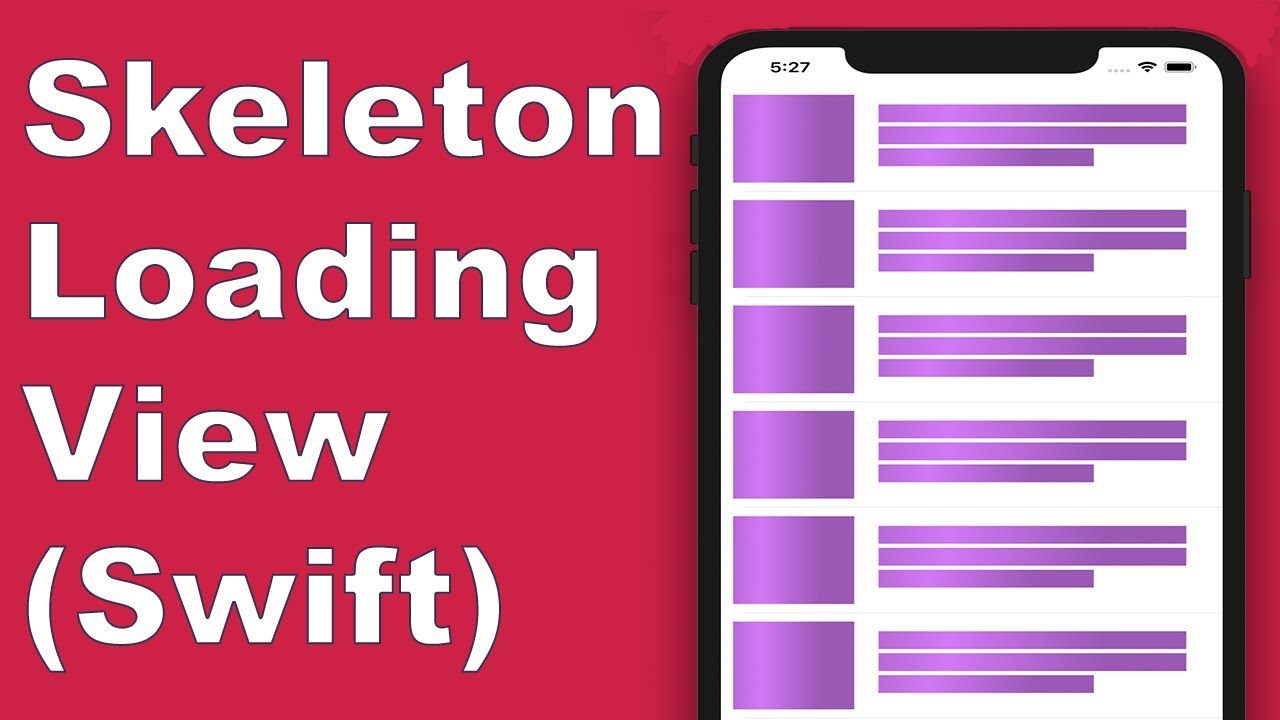
Today almost all apps have async processes, such as API requests, long running processes, etc. While the processes are working, usually developers place a loading view to show users that something is going on.
SkeletonView has been conceived to address this need, an elegant way to show users that something is happening and also prepare them for which contents are waiting.
Enjoy it! 🙂
- 🌟 Features
- 🎬 Guides
- 📲 Installation
- 🐒 Usage
- ✨ Miscellaneous
- ❤️ Contributing
- 📢 Mentions
- 🏆 Sponsors
- 👨🏻💻 Author
- 👮🏻 License
🌟 Features
- Easy to use
- All UIViews are skeletonables
- Fully customizable
- Universal (iPhone & iPad)
- Interface Builder friendly
- Simple Swift syntax
- Lightweight readable codebase
🎬 Guides



📲 Installation
pod 'SkeletonView'
github "Juanpe/SkeletonView"
dependencies: [
  .package(url: "https://github.com/Juanpe/SkeletonView.git", from: "1.7.0")
]
📣 IMPORTANT!
Since version 1.30.0,
SkeletonViewsupports XCFrameworks, so if you want to install it as a XCFramework, please use this repo instead.
🐒 Usage
Only 3 steps needed to use SkeletonView:
1️⃣ Import SkeletonView in proper place.
import SkeletonView
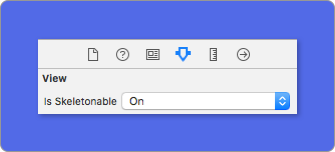
2️⃣ Now, set which views will be skeletonables. You achieve this in two ways:
Using code:
avatarImageView.isSkeletonable = true
Using IB/Storyboards:
3️⃣ Once you've set the views, you can show the skeleton. To do so, you have 4 choices:
(1) view.showSkeleton()                 // Solid
(2) view.showGradientSkeleton()         // Gradient
(3) view.showAnimatedSkeleton()         // Solid animated
(4) view.showAnimatedGradientSkeleton() // Gradient animated
Preview
| Solid | Gradient | Solid Animated | Gradient Animated |

|

|

|

|
📣 IMPORTANT!
SkeletonViewis recursive, so if you want show the skeleton in all skeletonable views, you only need to call the show method in the main container view. For example, withUIViewControllers.
🌿 Collections
SkeletonView is compatible with UITableView and UICollectionView.
UITableView
If you want to show the skeleton in a UITableView, you need to conform to SkeletonTableViewDataSource protocol.
public protocol SkeletonTableViewDataSource: UITableViewDataSource {
    func numSections(in collectionSkeletonView: UITableView) -> Int // Default: 1
    func collectionSkeletonView(_ skeletonView: UITableView, numberOfRowsInSection section: Int) -> Int
    func collectionSkeletonView(_ skeletonView: UITableView, cellIdentifierForRowAt indexPath: IndexPath) -> ReusableCellIdentifier
    func collectionSkeletonView(_ skeletonView: UITableView, skeletonCellForRowAt indexPath: IndexPath) -> UITableViewCell? // Default: nil
    func collectionSkeletonView(_ skeletonView: UITableView, prepareCellForSkeleton cell: UITableViewCell, at indexPath: IndexPath)
}
As you can see, this protocol inherits from UITableViewDataSource, so you can replace this protocol with the skeleton protocol.
This protocol has a default implementation for some methods. For example, the number of rows for each section is calculated in runtime:
func collectionSkeletonView(_ skeletonView: UITableView, numberOfRowsInSection section: Int) -> Int
// Default:
// It calculates how many cells need to populate whole tableview
📣 IMPORTANT!
If you return
UITableView.automaticNumberOfSkeletonRowsin the above method, it acts like the default behavior (i.e. it calculates how many cells needed to populate the whole tableview).
There is only one method you need to implement to let Skeleton know the cell identifier. This method doesn't have default implementation:
func collectionSkeletonView(_ skeletonView: UITableView, cellIdentifierForRowAt indexPath: IndexPath) -> ReusableCellIdentifier {
   return "CellIdentifier"
}
By default, the library dequeues the cells from each indexPath, but you can also do this if you want to make some changes before the skeleton appears:
func collectionSkeletonView(_ skeletonView: UITableView, skeletonCellForRowAt indexPath: IndexPath) -> UITableViewCell? {
    let cell = skeletonView.dequeueReusableCell(withIdentifier: "CellIdentifier", for: indexPath) as? Cell
    cell?.textField.isHidden = indexPath.row == 0
    return cell
}
If you prefer to leave the deque part to the library you can configure the cell using this method:
func collectionSkeletonView(_ skeletonView: UITableView, prepareCellForSkeleton cell: UITableViewCell, at indexPath: IndexPath) {
    let cell = cell as? Cell
    cell?.textField.isHidden = indexPath.row == 0
}
Besides, you can skeletonize both the headers and footers. You need to conform to SkeletonTableViewDelegate protocol.
public protocol SkeletonTableViewDelegate: UITableViewDelegate {
    func collectionSkeletonView(_ skeletonView: UITableView, identifierForHeaderInSection section: Int) -> ReusableHeaderFooterIdentifier? // default: nil
    func collectionSkeletonView(_ skeletonView: UITableView, identifierForFooterInSection section: Int) -> ReusableHeaderFooterIdentifier? // default: nil
}
📣 IMPORTANT!
1️⃣ If you are using resizable cells (
tableView.rowHeight = UITableViewAutomaticDimension), it's mandatory define theestimatedRowHeight.2️⃣ When you add elements in a
UITableViewCellyou should add it tocontentViewand not to the cell directly.self.contentView.addSubview(titleLabel) ✅ self.addSubview(titleLabel) ❌
UICollectionView
For UICollectionView, you need to conform to SkeletonCollectionViewDataSource protocol.
public protocol SkeletonCollectionViewDataSource: UICollectionViewDataSource {
    func numSections(in collectionSkeletonView: UICollectionView) -> Int  // default: 1
    func collectionSkeletonView(_ skeletonView: UICollectionView, numberOfItemsInSection section: Int) -> Int
    func collectionSkeletonView(_ skeletonView: UICollectionView, cellIdentifierForItemAt indexPath: IndexPath) -> ReusableCellIdentifier
    func collectionSkeletonView(_ skeletonView: UICollectionView, supplementaryViewIdentifierOfKind: String, at indexPath: IndexPath) -> ReusableCellIdentifier? // default: nil
    func collectionSkeletonView(_ skeletonView: UICollectionView, skeletonCellForItemAt indexPath: IndexPath) -> UICollectionViewCell?  // default: nil
    func collectionSkeletonView(_ skeletonView: UICollectionView, prepareCellForSkeleton cell: UICollectionViewCell, at indexPath: IndexPath)
    func collectionSkeletonView(_ skeletonView: UICollectionView, prepareViewForSkeleton view: UICollectionReusableView, at indexPath: IndexPath)
}
The rest of the process is the same as UITableView
🔠 Texts
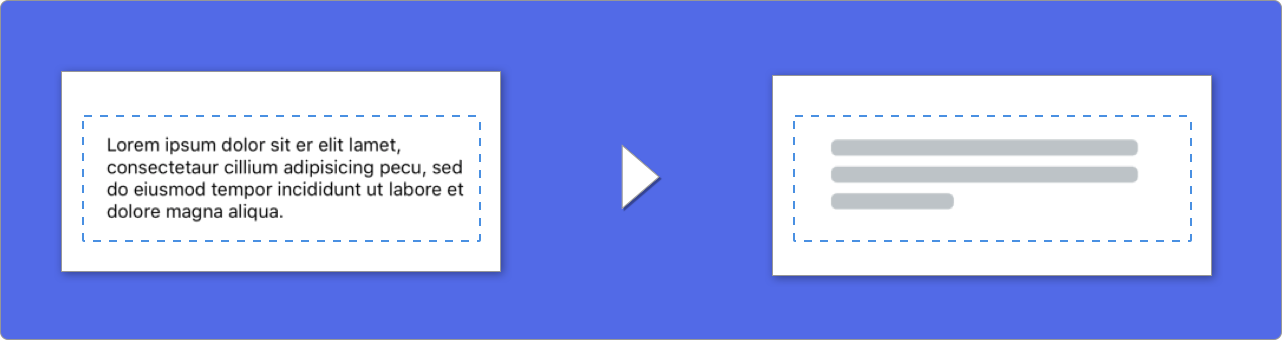
When using elements with text, SkeletonView draws lines to simulate text.
You can set some properties for multilines elements.
| Property | Type | Default | Preview |
|---|---|---|---|
| lastLineFillPercent | CGFloat |
70 |
 |
| linesCornerRadius | Int |
0 |
 |
| skeletonLineSpacing | CGFloat |
10 |
 |
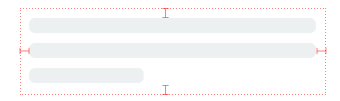
| skeletonPaddingInsets | UIEdgeInsets |
.zero |
 |
| skeletonTextLineHeight | SkeletonTextLineHeight |
.fixed(15) |
 |
| skeletonTextNumberOfLines | SkeletonTextNumberOfLines |
.inherited |
|
To modify the percent or radius using code, set the properties:
descriptionTextView.lastLineFillPercent = 50
descriptionTextView.linesCornerRadius = 5
Or, if you prefer use IB/Storyboard:
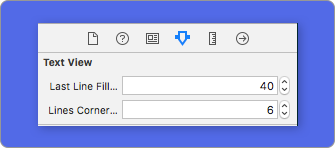
How to define the number of lines?
By default, the number of lines is the same as the value of the numberOfLines property. And, if it's set to zero, it'll calculate how many lines are needed to populate the whole skeleton and draw it.
However, if you want to set a specific number of skeleton lines you can do it by setting the skeletonTextNumberOfLines property. This property has two possible values, inherited which returns numberOfLines value and custom(Int) which returns the specific number of lines specified as the associated value.
For example:
label.skeletonTextNumberOfLines = 3 // .custom(3)
⚠️ DEPRECATED!
useFontLineHeight has been deprecated. You can use skeletonTextLineHeight instead:
descriptionTextView.skeletonTextLineHeight = .relativeToFont
📣 IMPORTANT!
Please note that for views without multiple lines, the single line will be considered as the last line.
🦋 Appearance
The skeletons have a default appearance. So, when you don't specify the color, gradient or multilines properties, SkeletonView uses the default values.
Default values:
- tintColor:
UIColor- default:
.skeletonDefault(same as.cloudsbut adaptive to dark mode)
- default:
- gradient: SkeletonGradient
- default:
SkeletonGradient(baseColor: .skeletonDefault)
- default:
- multilineHeight:
CGFloat- default: 15
- multilineSpacing:
CGFloat- default: 10
- multilineLastLineFillPercent:
Int- default: 70
- multilineCornerRadius:
Int- default: 0
- skeletonCornerRadius:
CGFloat(IBInspectable) (Make your skeleton view with corner)- default: 0
To get these default values you can use SkeletonAppearance.default. Using this property you can set the values as well:
SkeletonAppearance.default.multilineHeight = 20
SkeletonAppearance.default.tintColor = .green
⚠️ DEPRECATED!
useFontLineHeight has been deprecated. You can use textLineHeight instead:
SkeletonAppearance.default.textLineHeight = .relativeToFont
🎨 Custom colors
You can decide which color the skeleton is tinted with. You only need to pass as a parameter the color or gradient you want.
Using solid colors
view.showSkeleton(usingColor: UIColor.gray) // Solid
// or
view.showSkeleton(usingColor: UIColor(red: 25.0, green: 30.0, blue: 255.0, alpha: 1.0))
Using gradients
let gradient = SkeletonGradient(baseColor: UIColor.midnightBlue)
view.showGradientSkeleton(usingGradient: gradient) // Gradient
Besides, SkeletonView features 20 flat colors 🤙🏼
UIColor.turquoise, UIColor.greenSea, UIColor.sunFlower, UIColor.flatOrange ...

Image captured from website https://flatuicolors.com
🏃♀️ Animations
SkeletonView has two built-in animations, pulse for solid skeletons and sliding for gradients.
Besides, if you want to do your own skeleton animation, it's really easy.
Skeleton provides the showAnimatedSkeleton function which has a SkeletonLayerAnimation closure where you can define your custom animation.
public typealias SkeletonLayerAnimation = (CALayer) -> CAAnimation
You can call the function like this:
view.showAnimatedSkeleton { (layer) -> CAAnimation in
  let animation = CAAnimation()
  // Customize here your animation

  return animation
}
It's available SkeletonAnimationBuilder. It's a builder to make SkeletonLayerAnimation.
Today, you can create sliding animations for gradients, deciding the direction and setting the duration of the animation (default = 1.5s).
// func makeSlidingAnimation(withDirection direction: GradientDirection, duration: CFTimeInterval = 1.5) -> SkeletonLayerAnimation

let animation = SkeletonAnimationBuilder().makeSlidingAnimation(withDirection: .leftToRight)
view.showAnimatedGradientSkeleton(usingGradient: gradient, animation: animation)
GradientDirection is an enum, with theses cases:
| Direction | Preview |
|---|---|
| .leftRight |  |
| .rightLeft |  |
| .topBottom |  |
| .bottomTop |  |
| .topLeftBottomRight |  |
| .bottomRightTopLeft |  |
😉 TRICK!
Exist another way to create sliding animations, just using this shortcut:
let animation = GradientDirection.leftToRight.slidingAnimation()
🏄 Transitions
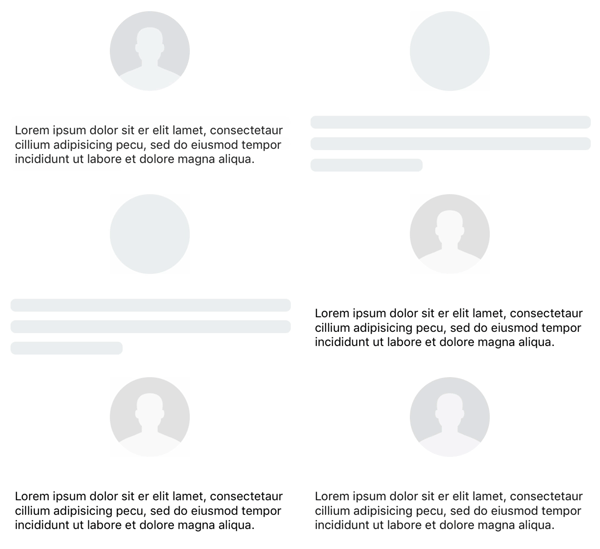
SkeletonView has built-in transitions to show or hide the skeletons in a smoother way 🤙
To use the transition, simply add the transition parameter to your showSkeleton() or hideSkeleton() function with the transition time, like this:
view.showSkeleton(transition: .crossDissolve(0.25))     //Show skeleton cross dissolve transition with 0.25 seconds fade time
view.hideSkeleton(transition: .crossDissolve(0.25))     //Hide skeleton cross dissolve transition with 0.25 seconds fade time
The default value is crossDissolve(0.25)
Preview
| None | Cross dissolve |

|
|
✨ Miscellaneous
Hierarchy
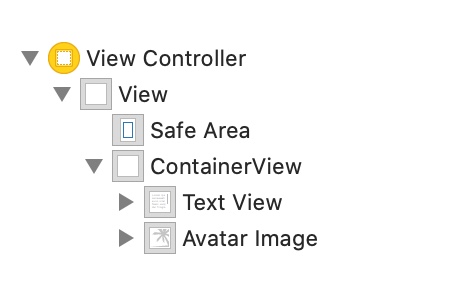
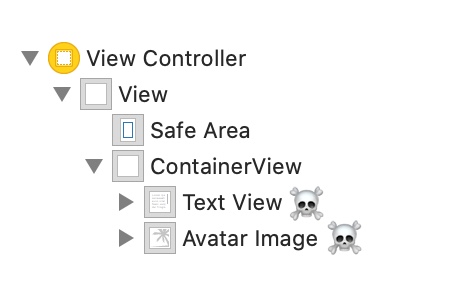
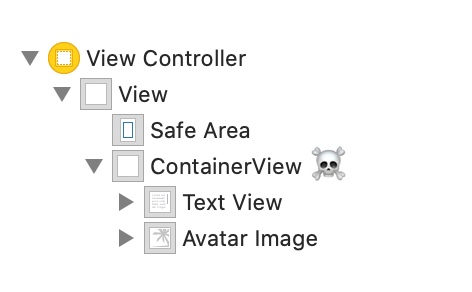
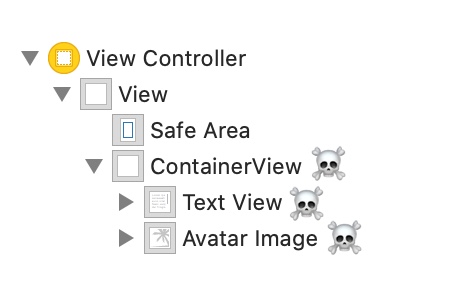
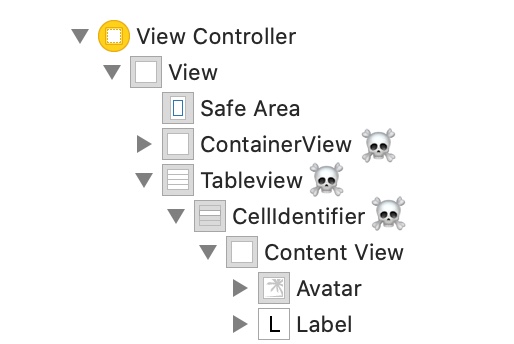
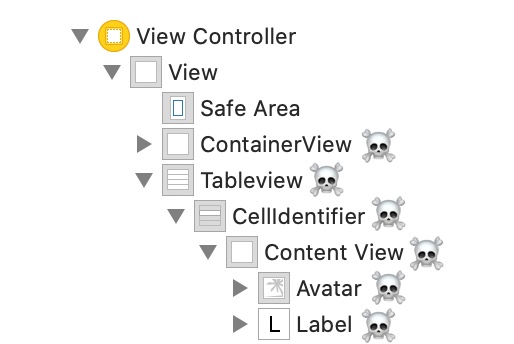
Since SkeletonView is recursive, and we want skeleton to be very efficient, we want to stop recursion as soon as possible. For this reason, you must set the container view as Skeletonable, because Skeleton will stop looking for skeletonable subviews as soon as a view is not Skeletonable, breaking then the recursion.
Because an image is worth a thousand words:
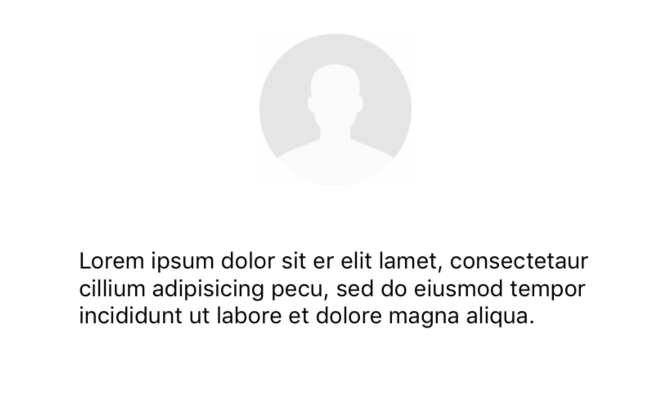
In this example we have a UIViewController with a ContainerView and a UITableView. When the view is ready, we show the skeleton using this method:
view.showSkeleton()
isSkeletonable= ☠️
| Configuration | Result |
|---|---|
 |
 |
 |
|
 |
 |
 |
 |
 |
 |
 |
 |
Skeleton views layout
Sometimes skeleton layout may not fit your layout because the parent view bounds have changed. For example, rotating the device.
You can relayout the skeleton views like so:
override func viewDidLayoutSubviews() {
    view.layoutSkeletonIfNeeded()
}
📣 IMPORTANT!
You shouldn't call this method. From version 1.8.1 you don't need to call this method, the library does automatically. So, you can use this method ONLY in the cases when you need to update the layout of the skeleton manually.
Update skeleton
You can change the skeleton configuration at any time like its colour, animation, etc. with the following methods:
(1) view.updateSkeleton()                 // Solid
(2) view.updateGradientSkeleton()         // Gradient
(3) view.updateAnimatedSkeleton()         // Solid animated
(4) view.updateAnimatedGradientSkeleton() // Gradient animated
Hiding views when the animation starts
Sometimes you wanna hide some view when the animation starts, so there is a quick property that you can use to make this happen:
view.isHiddenWhenSkeletonIsActive = true // This works only when isSkeletonable = true
Don't modify user interaction when the skeleton is active
By default, the user interaction is disabled for skeletonized items, but if you don't want to modify the user interaction indicator when skeleton is active, you can use the isUserInteractionDisabledWhenSkeletonIsActive property:
view.isUserInteractionDisabledWhenSkeletonIsActive = false // The view will be active when the skeleton will be active.
Don't use the font line height for the skeleton lines in labels
False to disable skeleton to auto-adjust to font height for a UILabel or UITextView. By default, the skeleton lines height is auto-adjusted to font height to more accurately reflect the text in the label rect rather than using the bounding box.
label.useFontLineHeight = false
Delayed show skeleton
You can delay the presentation of the skeleton if the views update quickly.
func showSkeleton(usingColor: UIColor,
                  animated: Bool,
                  delay: TimeInterval,
                  transition: SkeletonTransitionStyle)
func showGradientSkeleton(usingGradient: SkeletonGradient,
                          animated: Bool,
                          delay: TimeInterval,
                          transition: SkeletonTransitionStyle)
Debug
To facilitate the debug tasks when something is not working fine. SkeletonView has some new tools.
First, UIView has available a property with his skeleton info:
var sk.skeletonTreeDescription: String
Besides, you can activate the new debug mode. You just add the environment variable SKELETON_DEBUG and activate it.
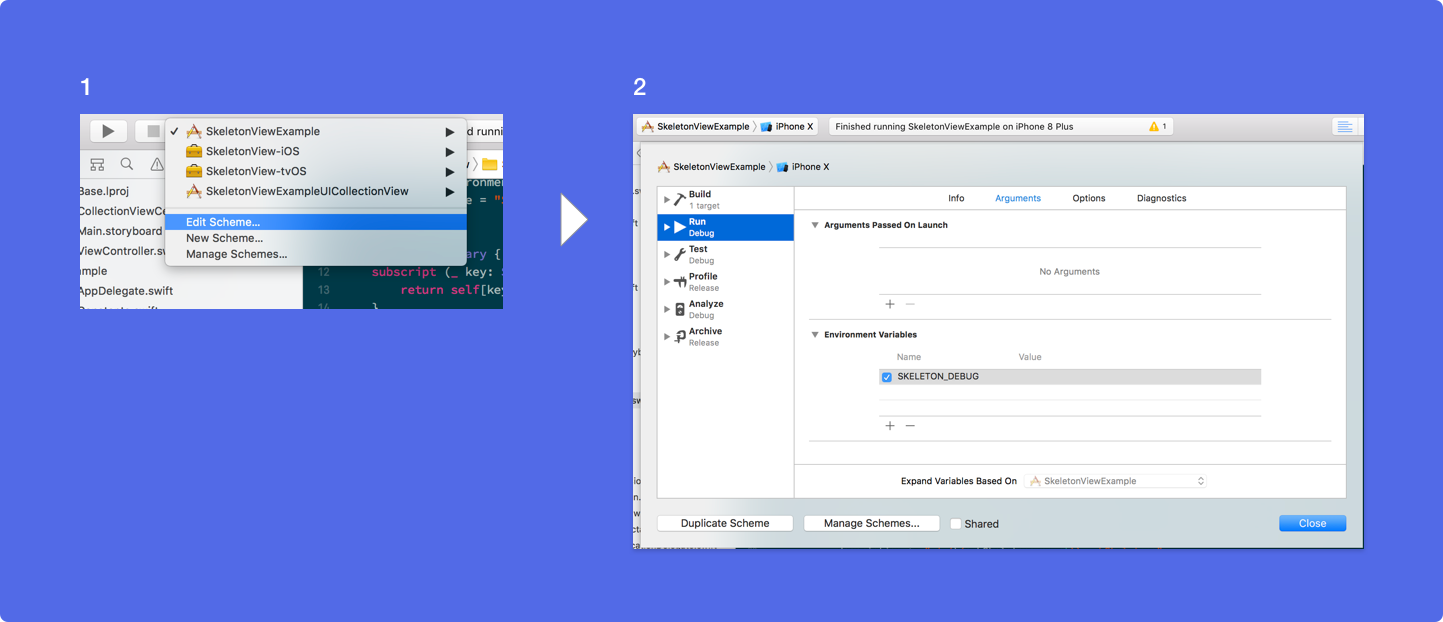
Then, when the skeleton appears, you can see the view hierarchy in the Xcode console.
{
  "type" : "UIView", // UITableView, UILabel...
  "isSkeletonable" : true,
  "reference" : "0x000000014751ce30",
  "children" : [
    {
      "type" : "UIView",
      "isSkeletonable" : true,
      "children" : [ ... ],
      "reference" : "0x000000014751cfa0"
    }
  ]
}
Supported OS & SDK Versions
- iOS 9.0+
- tvOS 9.0+
- Swift 5.3
❤️ Contributing
This is an open source project, so feel free to contribute. How?
- Open an issue.
- Send feedback via email.
- Propose your own fixes, suggestions and open a pull request with the changes.
See all contributors
For more information, please read the contributing guidelines.
📢 Mentions
- iOS Dev Weekly #327
- Hacking with Swift Articles
- Top 10 Swift Articles November
- 30 Amazing iOS Swift Libraries (v2018)
- AppCoda Weekly #44
- iOS Cookies Newsletter #103
- Swift Developments Newsletter #113
- iOS Goodies #204
- Swift Weekly #96
- CocoaControls
- Awesome iOS Newsletter #74
- Swift News #36
- Best iOS articles, new tools & more
🏆 Sponsors
Open-source projects cannot live long without your help. If you find SkeletonView is useful, please consider supporting this project by becoming a sponsor.
Become a sponsor through GitHub Sponsors :heart:
👨🏻💻 Author

👮🏻 License
MIT License

Copyright (c) 2017 Juanpe Catalán

Permission is hereby granted, free of charge, to any person obtaining a copy
of this software and associated documentation files (the "Software"), to deal
in the Software without restriction, including without limitation the rights
to use, copy, modify, merge, publish, distribute, sublicense, and/or sell
copies of the Software, and to permit persons to whom the Software is
furnished to do so, subject to the following conditions:

The above copyright notice and this permission notice shall be included in all
copies or substantial portions of the Software.

THE SOFTWARE IS PROVIDED "AS IS", WITHOUT WARRANTY OF ANY KIND, EXPRESS OR
IMPLIED, INCLUDING BUT NOT LIMITED TO THE WARRANTIES OF MERCHANTABILITY,
FITNESS FOR A PARTICULAR PURPOSE AND NONINFRINGEMENT. IN NO EVENT SHALL THE
AUTHORS OR COPYRIGHT HOLDERS BE LIABLE FOR ANY CLAIM, DAMAGES OR OTHER
LIABILITY, WHETHER IN AN ACTION OF CONTRACT, TORT OR OTHERWISE, ARISING FROM,
OUT OF OR IN CONNECTION WITH THE SOFTWARE OR THE USE OR OTHER DEALINGS IN THE
SOFTWARE.